Heading out the door? Read this article on the new Outside+ app available now on iOS devices for members! Download the app.
How often have you heard people say, “I can’t do yoga—I can’t even touch my toes”? What they don’t realize is that yoga isn’t about touching your toes or achieving any other goal; it’s about learning to skillfully move your body through its appropriate range of motion. When you practice Prasarita Padottanasana (Wide-Legged Standing Forward Bend), the aim is to fold forward from the hips so that you can stretch your hamstrings without straining your back. It doesn’t matter how close you get to the ground. What matters is that you learn to stabilize your legs and your spine while you bend forward.
Learning to work this way will likely save you from back pain and strain down the line. Consider this: You fold forward from standing all the time in daily life—to pick something up from the floor, for example—and since you do it so often, it can be challenging to do it with full attention. But if you’re not aware, you’ll likely round your back when you bend forward. Over time, this can overstretch and destabilize, or create strain in, the lower back.
When you do Prasarita Padottanasana mindfully, it stretches your hamstrings, calves, and hips; strengthens your feet, ankles, and legs; and builds awareness of how to protect your lower back. This pose is also a mild inversion, as it lowers your head and heart below your hips. The combination of the inverted shape and the forward fold tends to bring a wonderful feeling of calmness. Finally, this pose will build strength in your shoulders and upper back, and it will give length and ease to your neck muscles.
If you have tight hamstrings or hips, this pose will require a bit more skill and patience. Tight hamstrings will make it difficult for you to fold very far before your lower back begins to round. If this happens to you, bend your knees slightly to ease the stretch on your hamstrings so that you can keep your low back long and fold forward from your hip joints. Or you can choose to not go all the way to the floor: Place blocks under your hands to lift the floor to you.
Finding Focused Attention
If you are naturally flexible in your hips and hamstrings, you will need to firm your abdominals to support and prevent overarching of your lower back. And for those of you who are very open here, it will be helpful to limit how far you go by strongly contracting your hamstrings to prevent overstretching them. Focus on stabilizing your legs and spine and isolating the movement in your hip joints.
When you bring your full concentration to the actions of the pose, you will find yourself in a very focused state where all other concerns seem to dissolve. This is called ekagrata, or one-pointed attention. It is a state of mind that not only creates a skillful pose with all its benefits but also cultivates an ability to shift out of the multitasking, overactive mind-set the world seems to demand. The more often you practice, the more you will be able to concentrate on one thing. You will learn to find a concentrated focus where the mind can settle on one chosen object and let the rest of the world, for a time, carry on in its harried way without you.
Ground Yourself
Build Prasarita Padottanasana on a steady foundation. Think of each of the four corners of your feet: inner and outer heels, big toe mound, and pinkie-toe mound. As you press into these corners, lift your inner and outer arches. This lift travels upward, like a pair of zippers, firming the entire length of your legs and grounding your feet into the earth.
Step 1: Lengthen Your Spine
Set It Up:

1. Place your hands on the wall at hip height, shoulder-width apart.
2. Back away from the wall until your arms straighten.
3. Step your feet about 3 to 4 feet apart, toes pointing straight ahead.
4. Ground your feet, pressing down with all four corners of your feet.
Refine: Spread your toes wide, lift your inner arches, and work your legs as if you could zip your muscles all the way up to the tops of your inner thighs. Lift your kneecaps. Hug your inner upper thighs toward each other to stabilize your pelvis. Press your palms firmly into the wall and roll your upper outer arms down toward the floor, widening your upper back. Reach your sitting bones away from the wall to lengthen your spine. As an experiment, try curling your sitting bones under instead, to round your lower back. Then, try lifting them (you may need to bend your knees), to arch your lower back. Now, return to the middle, pointing your sitting bones straight back. This alignment will allow you to fold from the hip joints while keeping maximum length in your spine.
Finish: Breathe slowly for 5 or 6 breaths. Then walk your feet toward each other, remove your hands from the wall, and come to standing.
Step 2: Work Your Legs
Set It Up:

1. Step your feet about 3 to 4 feet apart with your toes pointing straight ahead.
2. Place two blocks on the floor in front of you, shoulder-width apart.
3. Ground all four corners of your feet and lift your arches.
4. Lift through your chest and fold forward from your hips, lengthening your spine.
5. Place your hands on the blocks and straighten your arms.
Refine: Engage all four sides of your legs, drawing the muscles upward into your hips. Lengthen your front body, reach your sternum and the crown of the head forward, and stretch your sitting bones straight back. Draw your shoulder blades down your back until your neck feels long. As you deepen the stretch in your hamstrings, make sure you keep your leg muscles fully engaged. Working the muscles while they are stretching will keep you from going too fast or too far. Now check in with your lower back. Stabilize your pelvis and find a neutral spine. If this is easy for you, try lowering the blocks and see if you can fold farther without rounding your back.
Finish: Press down into your feet and slowly come to Tadasana (Mountain Pose). Pause and notice how you feel.
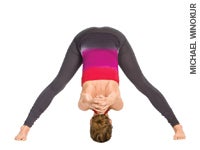
Final Pose: Stabilize and Stretch
Set It Up:

1. Step your feet about 3 to 4 feet apart, with your hands on your hips.
2. Lift up tall through your whole torso and fold slowly over your legs.
3. Place your hands flat on the floor, shoulder-width apart; begin to stretch your torso forward.
4. Fold deeper, bringing your head toward the floor. Bend your elbows, stacking them over your wrists.
Refine: Anchor your feet, firm your leg muscles up into your hips, and gently squeeze the outer thighs in. Lengthen your entire spine from your sitting bones to the crown of your head. Hug your forearms together, pointing your elbows straight back. Draw your shoulders up your back.
As you fold, make sure you are folding from your hip joints instead of rounding your lower back. If your hamstrings feel tight, you can choose not to fold all the way down. No matter how far you go, keep your legs active. As your hamstrings lengthen, think about contracting the muscles to control just how far to stretch. Find your edge and remember that yoga is about making skillful choices, not about getting to the deepest stretch.
Finish: After taking several breaths, ground into your feet, straighten your arms, and lengthen your spine forward. Inhaling, slowly lift up to standing; then exhale. Step your feet together, come into Mountain Pose, and pause to breathe.
Adjust Yourself
Try these adjustments to optimize the pose for your body:
- Find the best foot placement: The wider your stance is, the easier it is to bend forward. But if it’s too wide, you may feel unstable.
- Protect your knees: If your knees can hyperextend, practice with a slight bend in your knees to keep your hamstrings engaged.
- Support your head: If you feel uneasy or mildly dizzy, try putting a block under your head. Supporting your head can be calming.
- Exit slowly: If you are prone to dizziness or have low blood pressure, take several breaths to come up slowly out of the pose.
Elements of Practice
Find your focus. Ekagrata (one-pointed focus) is the first step in the internal practice of yoga, leading to more profound levels of meditation. It is concentration, or the ability to place all of one’s attention on a single object that eclipses all distractions. As you practice Prasarita Padottanasana, focus on each alignment point or muscular action to bring your mind to this steady state. As you focus on folding at the hip joints and stabilizing other parts of your body, you may begin to experience the stress-free feeling of being fully immersed in your practice.
Watch a video demonstration of this pose.
Annie Carpenter leads classes and trainings and mentors teachers at the Exhale Center for Sacred Movement in Venice, California.